[This post is a repost from https://yoursunny.com/t/2016/nfd-prefix/ written by NDN developer Junxiao Shi]
Named Data Networking (NDN) is a potential future Internet architecture designed as a distribution network. My last post on yoursunny.com described how to connect an end host running NDN Forwarding Daemon (NFD) to the NDN Testbed, a backbone NDN network for research purposes, and retrieve contents from that network. An equally important topic is: how can you publish contents into the backbone network?
As mentioned in the last post, NDN communication is receiver driven. Interests expressed by the consumer application are forwarded toward the producer following the routing table, and Data packets carrying contents flow back on the reverse path of Interests. Every end host and router along the path between consumer and producer needs to have a route in its routing table, so that NFD can forward the Interest, hop by hop, toward the producer. On your own machine, nfdc register command adds a route to the routing table; however, if you want to publish contents into the backbone network and make them available for others to retrieve, you won’t be able to directly execute nfdc register command on a terminal of the routers. How can you add a route without console access?
Prefix Registration Protocol
Before I talk about how to add a route onto a router, let’s have a look at how nfdc register works under the hood. nfdc register implements NFD Management Protocol. When you execute nfdc register /A udp4://192.0.2.1:6363, the program connects to the local NFD instance via a Unix socket, and sends a command to instruct NFD to add a route for /A prefix toward the specified UDP tunnel. The command is encoded as an NDN Interest. All the parameters you entered on the command line are encoded into the name of this Interest. The name also contains a timestamp to prevent a command being processed twice, and a signature which identifies who is sending the command. When NFD receives this Interest, it dispatches the Interest to the management module, which would check the signature and the timestamp, and then decode and execute the command. If everything goes well, the management module generates a successful response as a Data packet, which goes back to nfdc register program and gets displayed on your terminal.
Since the prefix registration command is actually an Interest, you could manually construct the Interest and send it to NFD via a Unix socket, and NFD would execute it indiscriminately, as long as you get the syntax right.
More importantly, the Interest could be sent over a UDP tunnel to a remote NFD instance, and then you can add a route on the router! remote-register-prefix is an unofficial program that allows you to do just that.
However, don’t get too excited yet. As introduced above, the Interest name contains a signature to identify who is sending the command. In most deployments, the default setting of NFD allows anyone to execute any command if the command is sent over a Unix socket. However, when you send the command over a UDP tunnel to a remote NFD instance on the NDN Testbed, more strict signature checking rules will apply. As of Jun 2016, the routers accept a signature only if your certificate can be traced, in a PKI-like hierarchical model, to be trusted by the NDN Testbed Root.
Everyone who has research intentions can request a trusted certificate on ndncert system. Typically, a certificate request on ndncert is manually reviewed in 24 hours. Once your certificate has been approved and correctly installed, you may use remote-register-prefix with this certificate to add a route on the router.
$ remote-register-prefix -p /A -f udp4://131.179.196.46:6363 -i /ndn/edu/arizona/cs/shijunxiao
OK: /A udp4://131.179.196.46:6363
Looking at the router’s status page, you will find the prefix showing up in “RIB” section:

/A on spurs status page
Automatic Prefix Propagation
NFD itself contains Automatic Prefix Propagation, a module that helps an end host to add a route toward itself on the router. Unlike nfdc register and remote-register-prefix which are executed manually, Automatic Prefix Propagation is “automatic”: when a producer application registers itself with the local NFD, if the producer’s name prefix falls under one of the prefixes configured in the Automatic Prefix Propagation, NFD would send a prefix registration command to the router, so that Interests under this prefix can come to the end host NFD and go to the producer application. Since the prefix registration originally comes from a producer application, and this module sends a prefix registration command to the router, it’s called “propagation” in the sense that the prefix registration gets propagated through this module.
Prefixes to Propagate
Automatic Prefix Propagation is somewhat tricky to setup, because the list of prefixes to propagate is not specified in a configuration file, but in the form of a key chain, a container of public-private key pairs. The rationale of this design is that, NFD needs to have access to a user certificate in order to create a valid signature for the prefix registration command. An “identity name” can be derived from the certificate name by dropping certain name components that distinguishes public keys and certificates versions. This “identity name” is the only name prefix that Automatic Prefix Propagation would be willing to send prefix registration commands for; as of NFD 0.4.1, you cannot instruct Automatic Prefix Propagation to register any other prefix, even if your certificate is technically capable of adding a route with any name prefix on the router (as shown in the remote-register-prefix example above).
Where’s the Key Chain?
To make things more confusing, depending on how NFD was installed, you may have to hunt for where Automatic Prefix Propagation’s key chain is stored. Generally, if you installed NFD from source code, the key chain should be in your home directory; if you installed NFD from Ubuntu packages, the key chain would hide inside /var/lib/ndn/nfd. If you are unsure, cat /proc/$(pgrep nfd)/environ | tr '\0' '\n' | grep HOME= may be able to help you; this one-liner shows the $HOME environ of NFD process, which defines the location of its key chain.
If the key chain is in your home directory, as in the case when you installed NFD from source code, Automatic Prefix Propagation should already be able to use your certificates.
If the key chain is stored elsewhere, you’ll need to import your certificate, including the private key, into Automatic Prefix Propagation’s key chain.
Export your private key from your user account key chain into a file:
    $ ndnsec export -o shijunxiao.ndnkey -p /ndn/edu/arizona/cs/shijunxiao
    Passphrase for the private key:
    Confirm:
And then import it into Automatic Prefix Propagation’s key chain:
    $ sudo HOME=/var/lib/ndn/nfd -u ndn ndnsec import -p shijunxiao.ndnkey
    Passphrase for the private key:
    Confirm:
Restart NFD.
It’s important that Automatic Prefix Propagation’s key chain only contains certificates trusted by the NDN Testbed Root. A common mistake is to have an expired, self-signed, or otherwise invalid certificate lying around. If Automatic Prefix Propagation happens to use that certificate, the router would not trust the signature, and the prefix registration command would fail. This is true even if said invalid certificate is not set as the default. Therefore, delete all invalid certificates with ndnsec delete command (prefix it with sudo HOME=/var/lib/ndn/nfd -u ndn if your NFD is installed from Ubuntu packages), and ensure ndnsec list -c shows only valid certificates requested from ndncert system.
How to Trigger a Propagation?
To trigger Automatic Prefix Propagation to work for you, three conditions must be met at the same time:
* Your certificate is in Automatic Prefix Propagation’s key chain.
* There is a local producer application that has registered itself under the “identity name” of your certificate.
* Local NFD is connected to an NDN Testbed router.
The first condition is completed when you import your private key, and delete any invalid certificates, as described in the previous section.
To meet the second condition, you may run a producer application, such as our favorite ndnpingserver:
$ ndnpingserver /ndn/edu/arizona/cs/shijunxiao/laptop
PING SERVER /ndn/edu/arizona/cs/shijunxiao/laptop
The third condition obviously requires a UDP tunnel to a router. In addition, you must tell Automatic Prefix Propagation that this tunnel is a connection to an NDN Testbed router (rather than some other machine you have). This is done by adding a route in local NFD with a special prefix /localhop/nfd:
$ nfdc register / udp4://hobo.cs.arizona.edu
Successful in name registration: ControlParameters(Name: /, FaceId: 266, Origin: 255, Cost: 0, Flags: 1, )
$ nfdc register /localhop/nfd udp4://hobo.cs.arizona.edu
Successful in name registration: ControlParameters(Name: /localhop/nfd, FaceId: 266, Origin: 255, Cost: 0, Flags: 1, )
If everything goes well, you’ll finally see your prefix pops up on the router status page:
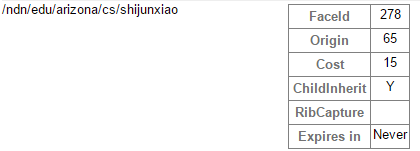
/ndn/edu/arizona/cs/shijunxiao on hobo status page
The prefix is shorter than producer application’s prefix, because it’s defined by the “identity name” that is derived from the certificate name. “Origin=65” denotes a route created by Automatic Prefix Propagation. As of NFD 0.4.1, none of these parameters are configurable.
Next Steps
Now you have added a route on an NDN Testbed router toward your local NFD, so that others can retrieve contents from you. However, if you have multiple machines, you either have to request a certificate from ndncert for each machine which is inconvenient as each request needs a 24-hour review period, or copy the private key onto every machine which is a security risk; also, if you request those certificates with the same email address, they would have the same “identity name” and hence Automatic Prefix Propagation would register the same prefix toward all your machines, causing inefficiencies in network performance. Junxiao’s next post, NFD: Issue Your Own NDN Certificates will explain how to create sub-certificates signed by your main certificate, and use them on all your machines.
Social tagging: certificate > nfd > nfdc > trust model > trust models > trustworthiness